To prevent streaks with your window cleaning robot, make sure you prepare the surface by wiping away dust and debris beforehand, and use the right cleaning solutions recommended by the manufacturer. Regularly maintain your device by checking brushes, sensors, and replacing worn parts. Adjust settings based on dirt levels and avoid cleaning in direct sunlight or hot weather. Proper preparation and maintenance will lead to a streak-free finish, and you’ll discover more tips that can help you achieve the best results.
Key Takeaways
- Use the correct cleaning solution formulated for glass and avoid harsh or greasy chemicals.
- Prepare windows by wiping with a microfiber cloth to remove dust and loose dirt beforehand.
- Adjust robot settings based on dirt levels and window size for optimal cleaning performance.
- Avoid cleaning in direct sunlight or on hot days to prevent quick drying and streak formation.
- Regularly inspect and maintain the robot, including brushes and sensors, for consistent, streak-free results.
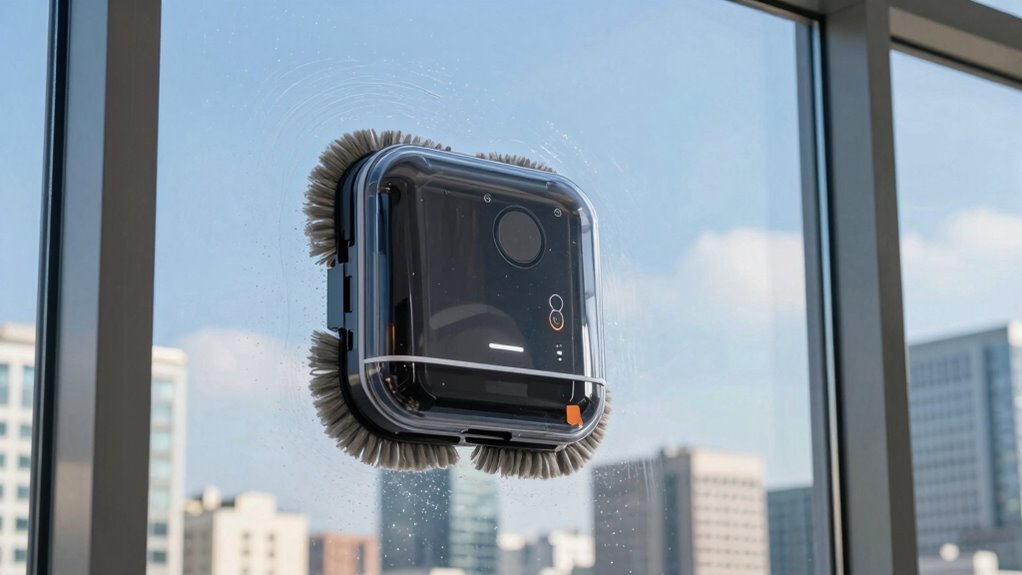
Have you ever wondered why your window cleaning robot leaves streaks despite its advanced features? It’s frustrating to watch your spotless windows end up with unsightly marks, especially when you’ve invested in a high-tech gadget. The key to preventing streaks often lies in simple maintenance and proper preparation. Regular robot maintenance is essential; it ensures your device functions smoothly and cleans thoroughly. Check the brushes, squeegees, and sensors frequently, removing any dirt, hair, or debris that might hinder performance. When parts are dirty or worn out, your robot can miss spots or apply uneven pressure, leading to streaks. Keeping everything in top shape gives you a more consistent, streak-free shine.
Regular maintenance and checking parts ensure your window cleaning robot works effectively and prevents streaks.
Another critical factor is the cleaning solution you use. Many people overlook this, but choosing the right cleaning solution can make a big difference. Use a cleaning solution specifically formulated for glass or the manufacturer’s recommended cleaning fluids. Avoid harsh chemicals or overly greasy solutions, as they’re more likely to leave residue that causes streaks. When applying the solution, spray it evenly and sparingly—drenched windows can cause excess liquid to drip and streak as the robot moves. Always ensure the cleaning solution is compatible with your robot’s materials; some solutions may damage rubber blades or sensors, impairing the robot’s ability to clean effectively. Additionally, the cleaning process can be optimized by adjusting the robot’s settings to suit different levels of dirt, improving overall results.
Before starting the robot, wipe down the windows with a microfiber cloth to remove dust and loose dirt. This initial step reduces the amount of grime the robot has to deal with, making its work more efficient and less likely to leave streaks. Also, check that the window surface is smooth and free of any obstacles or sticky spots. Any residue or uneven surface can cause the robot to skip areas or apply uneven pressure, resulting in streaks. If your robot has a cleaning schedule or settings, adjust them to match the level of dirt and the size of your windows. Sometimes, a quick manual wipe after the robot completes its task can help remove any remaining streaks and guarantee a spotless finish. Regularly inspecting and maintaining your device ensures optimal performance and longevity.
Finally, pay attention to the environment. Avoid cleaning windows in direct sunlight or on very hot days, as the cleaning solution can dry too quickly, leaving streaks. Proper device maintenance and preparing your windows thoroughly are essential steps to ensure optimal cleaning results. Additionally, proper cleaning techniques such as adjusting the robot’s speed or pressure can help minimize streaks and improve overall performance. Using the right indoor air quality gear in your home can also help reduce dust and grime buildup, making your cleaning tasks easier. By maintaining your robot regularly, choosing the right cleaning solution, and preparing your windows properly, you’ll considerably reduce streaks and enjoy crystal-clear, streak-free windows with minimal effort.

EAEGE Replacement Pads for Window Cleaning Robot, Microfiber Cleaning Clothes Window Cleaner Robot Replacement Set, Reusable Machine Washable, 8pcs
【Efficient Cleaning】The replacement pad used for the window cleaning robot has good cleaning power. It is assembled with…
As an affiliate, we earn on qualifying purchases.
As an affiliate, we earn on qualifying purchases.
Frequently Asked Questions
Can Window Cleaning Robots Work on All Window Types?
Window cleaning robots generally work on most window types, but check compatibility first. They handle glass, tinted, and some textured windows well. You can set automated scheduling to keep your windows spotless regularly. Keep in mind, battery life varies; longer-lasting batteries guarantee the robot can clean larger or multiple windows without interruption. Always verify your specific model’s compatibility to ensure effective cleaning without damage.
How Often Should I Run My Window Cleaning Robot?
You should run your window cleaning robot once every one to two weeks, depending on how dusty or dirty your windows get. Before cleaning, add a suitable cleaning solution if needed, and make certain your robot’s battery life is sufficient for the job. Regular use helps maintain streak-free, clear windows. Keep an eye on battery levels to avoid interruptions, and consider a cleaning schedule that matches your home’s environment.
Do Cleaning Robots Work in All Weather Conditions?
Think of your cleaning robot as a delicate butterfly, needing careful conditions to flourish. Weather limitations and robot durability mean it’s best to avoid using it in heavy rain, snow, or strong winds. Harsh elements can strain the device and reduce its lifespan. While some models are built for light rain or humid days, always check your robot’s specifications to verify it can handle the weather, keeping it in top shape.
Can a Window Robot Clean Interior and Exterior Windows Simultaneously?
No, most window cleaning robots can’t clean interior and exterior windows simultaneously. You’ll need to switch the robot between surfaces, guaranteeing it’s properly maintained and charged for each task. Regular robot maintenance, like cleaning sensors and brushes, extends battery life and keeps it functioning efficiently. Always monitor the robot during use, especially when switching tasks, to prevent streaks and ensure thorough cleaning on both interior and exterior windows.
What Safety Features Do Window Cleaning Robots Have?
Think of your window cleaning robot as a vigilant guard, equipped with safety sensors that detect obstacles and prevent falls. It also has an emergency shutoff that instantly stops the device if it senses a problem. These features keep you safe by avoiding accidents, much like a security system protecting your home. Rest assured, your robot’s safety measures are designed to guarantee worry-free cleaning, even when you’re not watching.
glass cleaning solution for window robots
As an affiliate, we earn on qualifying purchases.
As an affiliate, we earn on qualifying purchases.
Conclusion
Think of your window cleaning robot as a trusted friend who knows the secret to a streak-free shine. When I first used mine, I was amazed at how a simple pre-clean and proper placement made all the difference—like a painter preparing a canvas. With these tips, you’ll turn your windows into crystal-clear panes, revealing the world outside without a single streak. Trust the process, and enjoy the view—sparkling and spotless every time.
microfiber cloth for window cleaning
As an affiliate, we earn on qualifying purchases.
As an affiliate, we earn on qualifying purchases.
window cleaning robot sensors
As an affiliate, we earn on qualifying purchases.
As an affiliate, we earn on qualifying purchases.